Houseplant Rescue: How to Revive a Neglected Houseplant

Reviving neglected plants

Houseplants offer a wide range of benefits to our homes. Their showy foliage and air-purifying qualities bring a touch of nature inside. However well-intentioned we may be, sometimes our houseplants suffer the effects of neglect. We will look at how to revive your neglected houseplants and bring them back to their full glory.

What is a houseplant?

What is a houseplant?
Photo by Julia Wilson.

A houseplant is usually a foliage plant that is grown indoors. Foliage plants are typically evergreen perennials with decorative leaves. Technically, all plants are outdoors, but houseplants are often grown in locations where they wouldn’t survive outside. For example, a plant native to tropical rainforests would not survive as an outdoor plant in the United Kingdom.

Common issues with neglected houseplants

Sometimes life gets in the way, sickness, holidays, family emergencies and our houseplants suffer from the effects of neglect. In most cases, it is possible to revive them if they are caught in time and still have a viable root system. It is important to mention that indoor plants should be checked at least once a week, preferably more often, so that any potential problems can be picked up early.

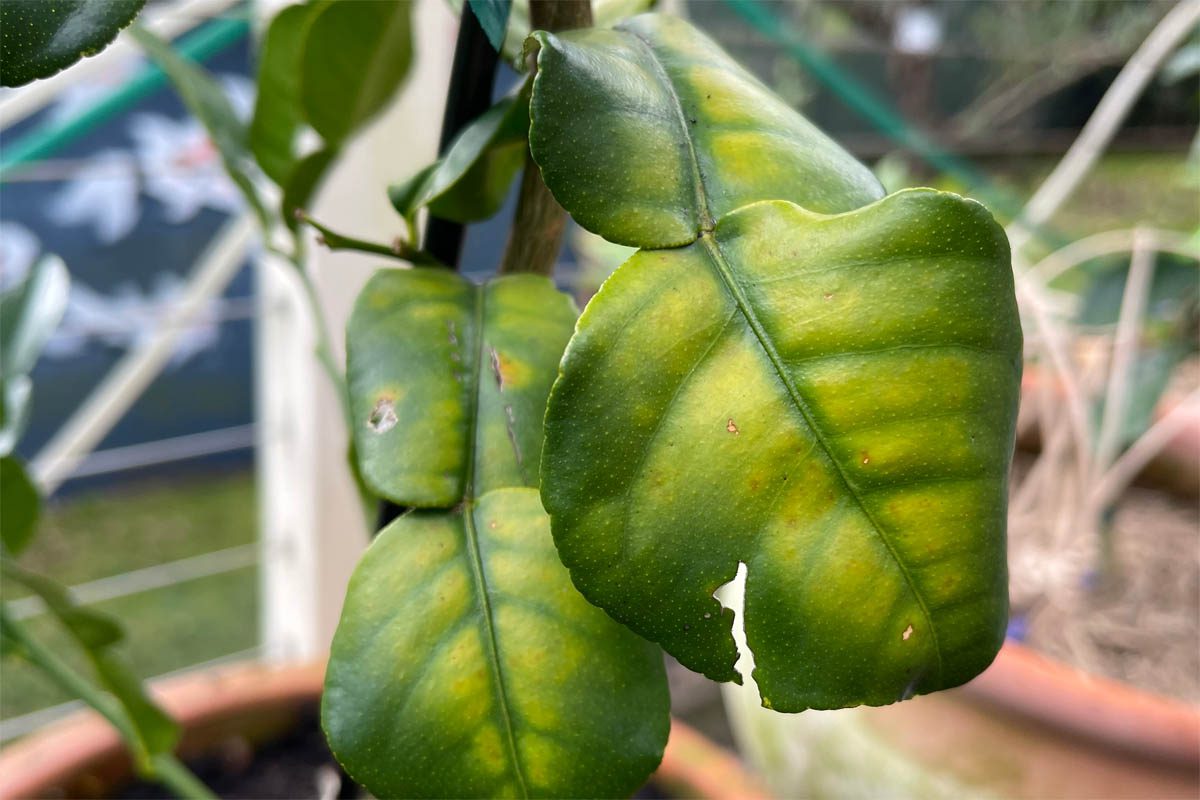
Yellowing leaves can occur for a number of reasons including nutrient deficiency (nitrogen, iron, magnesium, or sulphur), over-watering, under-watering, inadequate light, pests or disease.

Yellowing leaves
Yellowing leaves
Photo by Julia Wilson.
Nutrient deficiency

When a plant doesn’t receive a specific nutrient or nutrients, essential physiological processes are disrupted and it cannot perform functions efficiently. Nitrogen, iron, magnesium and sulfur can impact the production of chlorophyll and photosynthesis, resulting in leaf colour changes. Symptoms can vary depending on the nutrient involved. Plants will reallocate resources from older leaves to newer growth. So you may notice new growth appears normal, but older leaves are yellow.

pH imbalance

pH (potential of hydrogen) is a measure of acidity or alkalinity and plays a critical role in nutrient absorption. Each plant has unique pH preferences, however, most plants thrive in soils with a pH range of 6.0 to 7.0. pH imbalances interfere with the uptake of nutrients, resulting in deficiencies. Acidic soils (pH below 6.0) can limit the availability of nitrogen, phosphorus, and potassium while in alkaline soils (pH above 7.0), iron becomes less soluble and less available for plant uptake. This can lead to iron deficiency, causing interveinal chlorosis, where the leaves turn yellow while the veins remain green.

Overwatering

Constantly waterlogged soil becomes impacted which means there are fewer air pockets in the soil that are needed for the roots to uptake oxygen needed to respire and function properly. Without adequate oxygen, roots can become weak, stressed, or die. Root rot is a common problem in waterlogged soil as it creates a favourable environment for pathogens such as Pythium spp. that attack plant roots, impairing their ability to take up water and nutrients needed for healthy growth.

Underwatering

Insufficient water leads to dehydration and stress. The plant is unable to transport essential nutrients needed for critical physiological processes. Plant cells lose turgor pressure, which causes them to wilt and eventually turn yellow. Prolonged underwatering causes nutrient deficiencies, weakened root systems and reduced growth and vigour.

Inadequate light

Inadequate light leads to a reduction in chlorophyll production and photosynthesis. The plant struggles to produce energy required for growth and maintenance through photosynthesis. Chlorophyll can break down in the leaves to reallocate resources to other essential processes or new growth. Yellowing due to inadequate light typically starts with the lower and inner leaves, which receive the least amount of light. Etiolation may occur, as the plant tries to reach a source of light. The internodes elongate, producing a leggy plant.

Pests or disease

Spider mites, whiteflies, nematodes, viral and bacterial diseases can all impact leaf colour. Insects feed on plants or sap, causing yellowing and or wilting of the leaves. Root-knot nematodes are tiny worms that feed on plant roots, which impairs its ability to absorb water and nutrients. Bacterial leaf spot or bacterial wilt damage plant tissues, block the vascular system and ultimately disrupt nutrient and water transport within the plant. Viral infections such as mosaic viruses or yellow vein viruses, can cause yellowing leaves due to the disruption of normal plant cell functions and the alteration of chlorophyll production.

Brown tips and edges

Brown leaves on a variegated Monstera
Photo by Julia Wilson.

Overwatering: As mentioned above, overwatering can lead to hypoxia and root rot, which starves the plant of nutrients. From personal experience, the leaves of overwatered plants tend to slowly turn dark brown at the edges.

Underwatering

When a plant doesn’t receive adequate water, it is unable to maintain photosynthesis, transport nutrients, regulate temperature, maintain turgor pressure and cellular respiration. Plant cells lose water and wilt, which causes them to turn brown and dry out. Prolonged underwatering leads to widespread desiccation and browning of the leaves and eventually die.
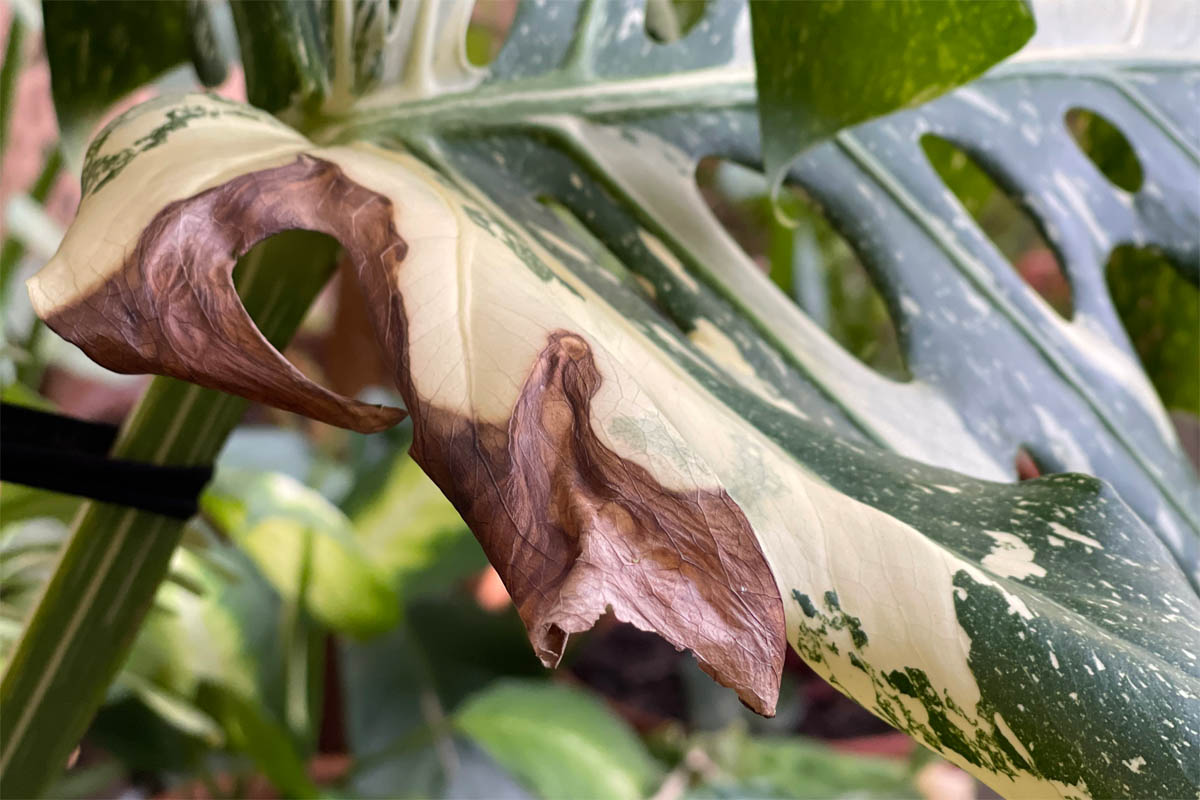
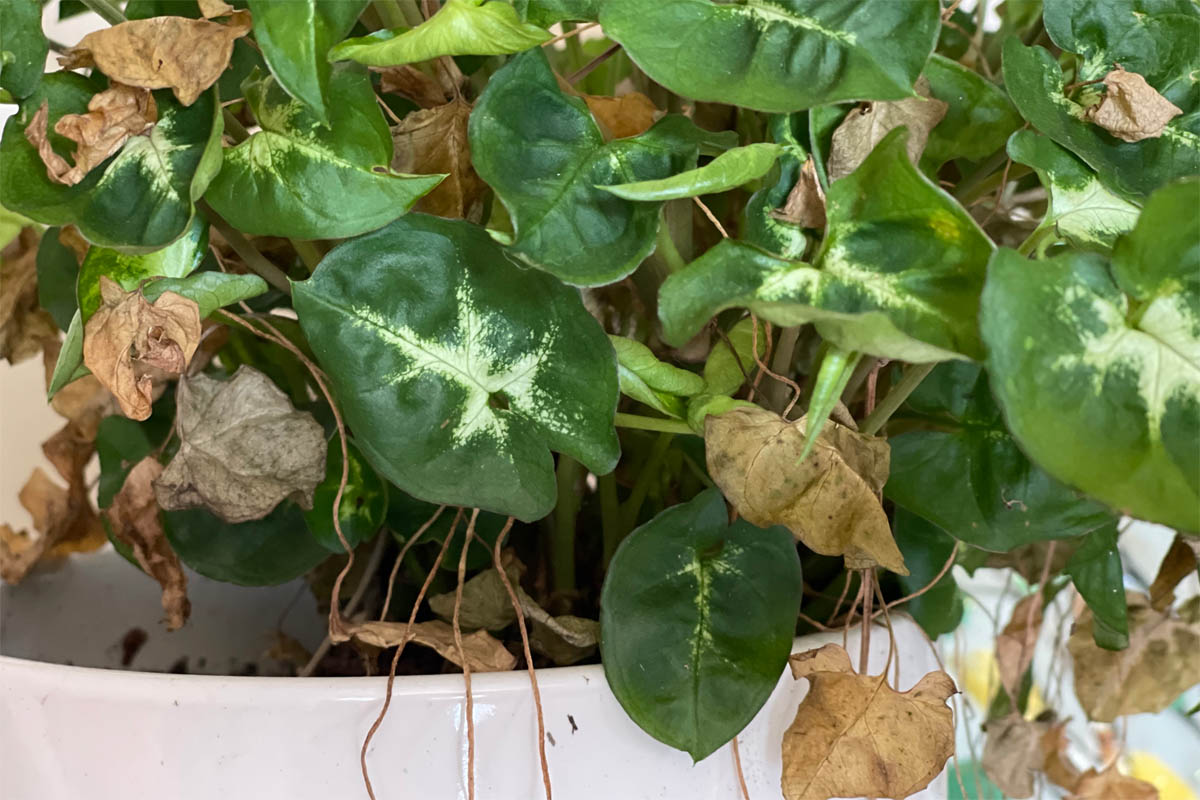
Leaf scorch

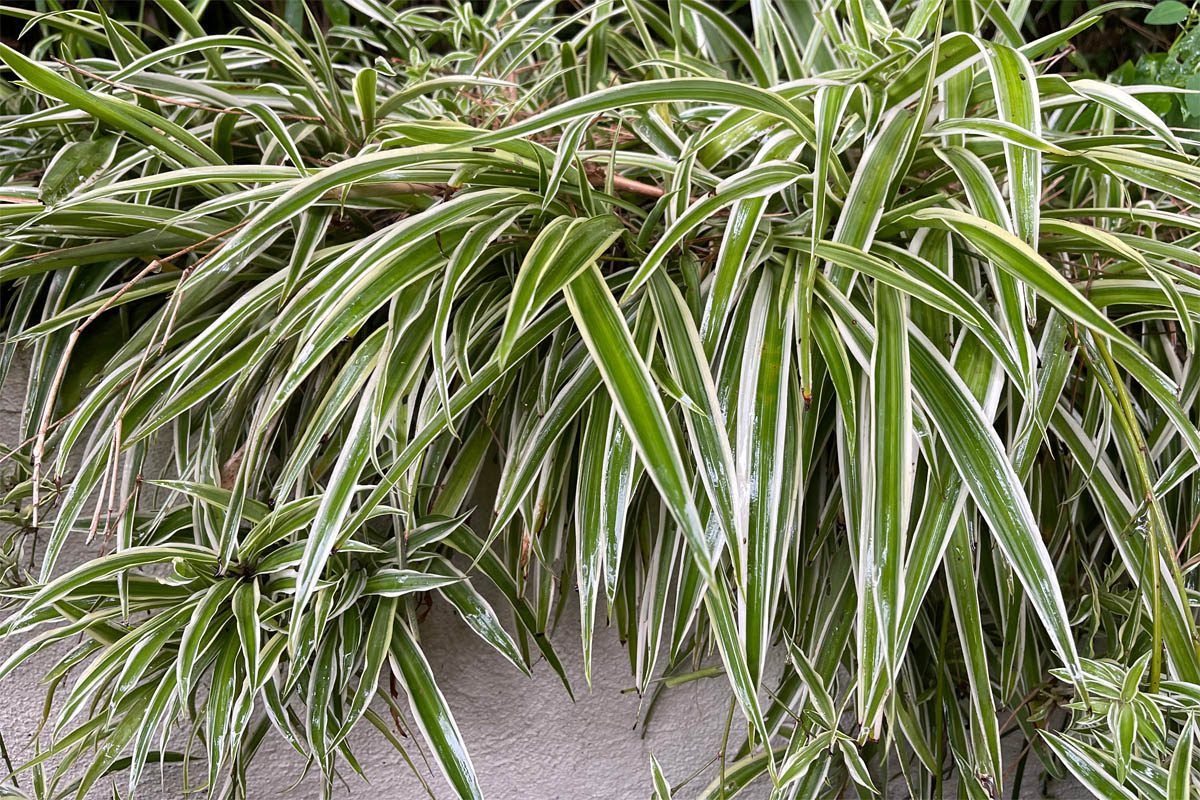
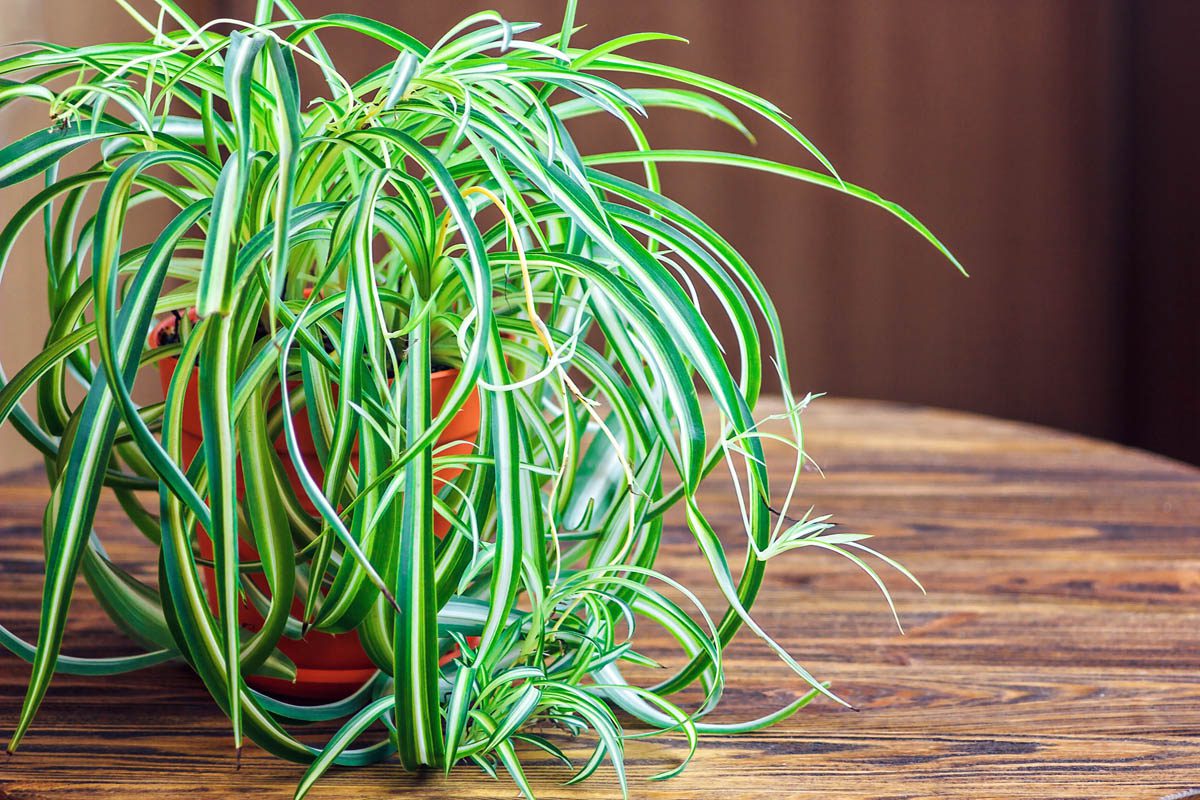
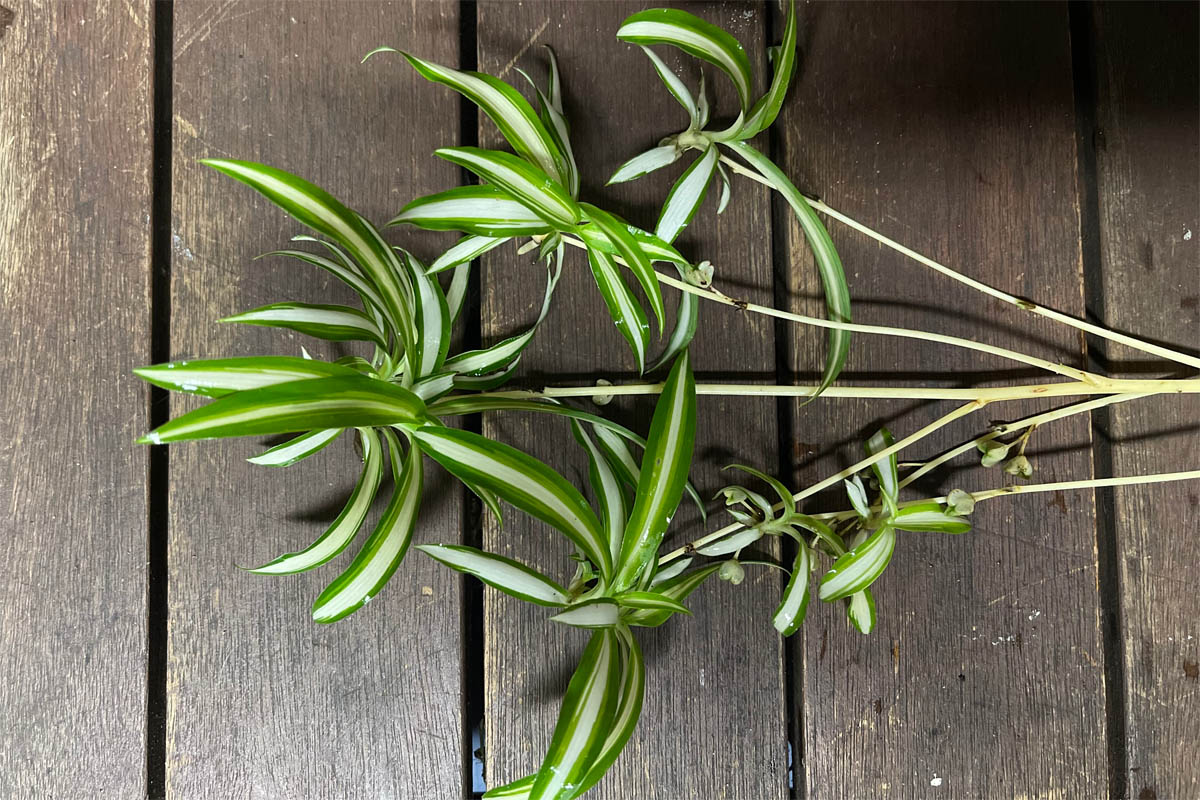
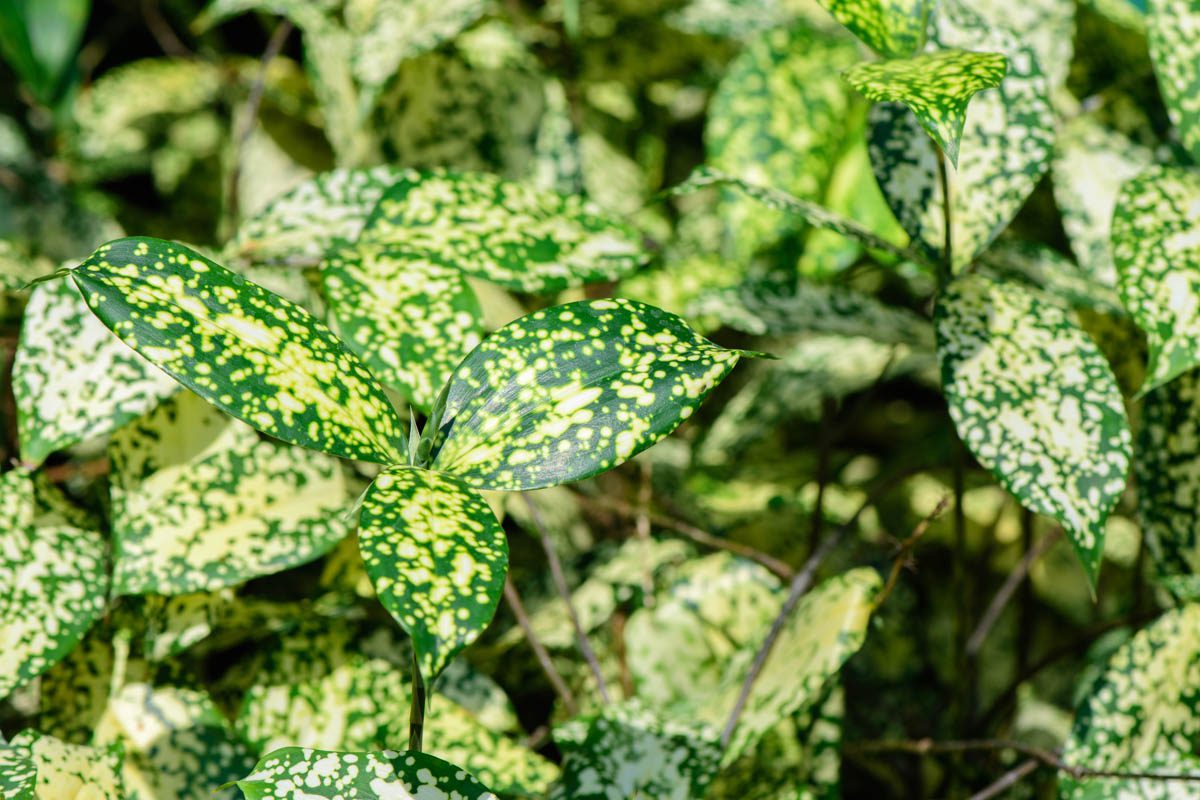
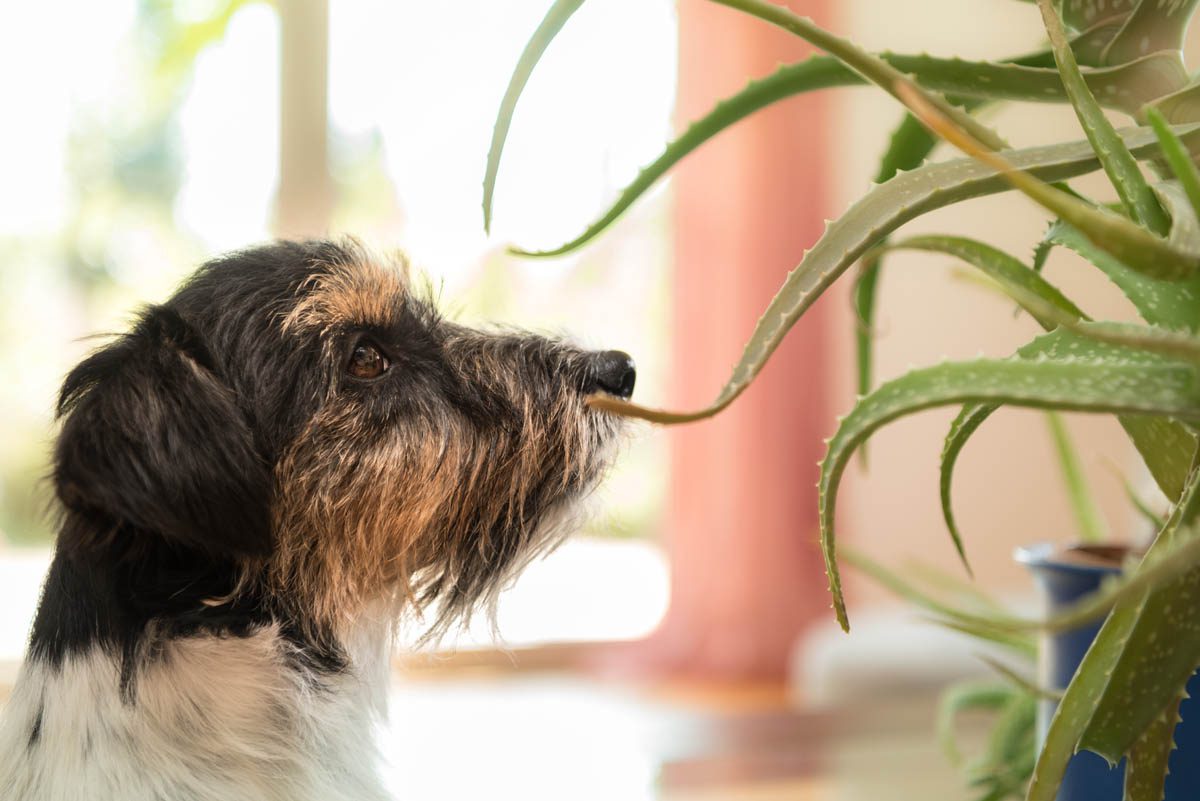
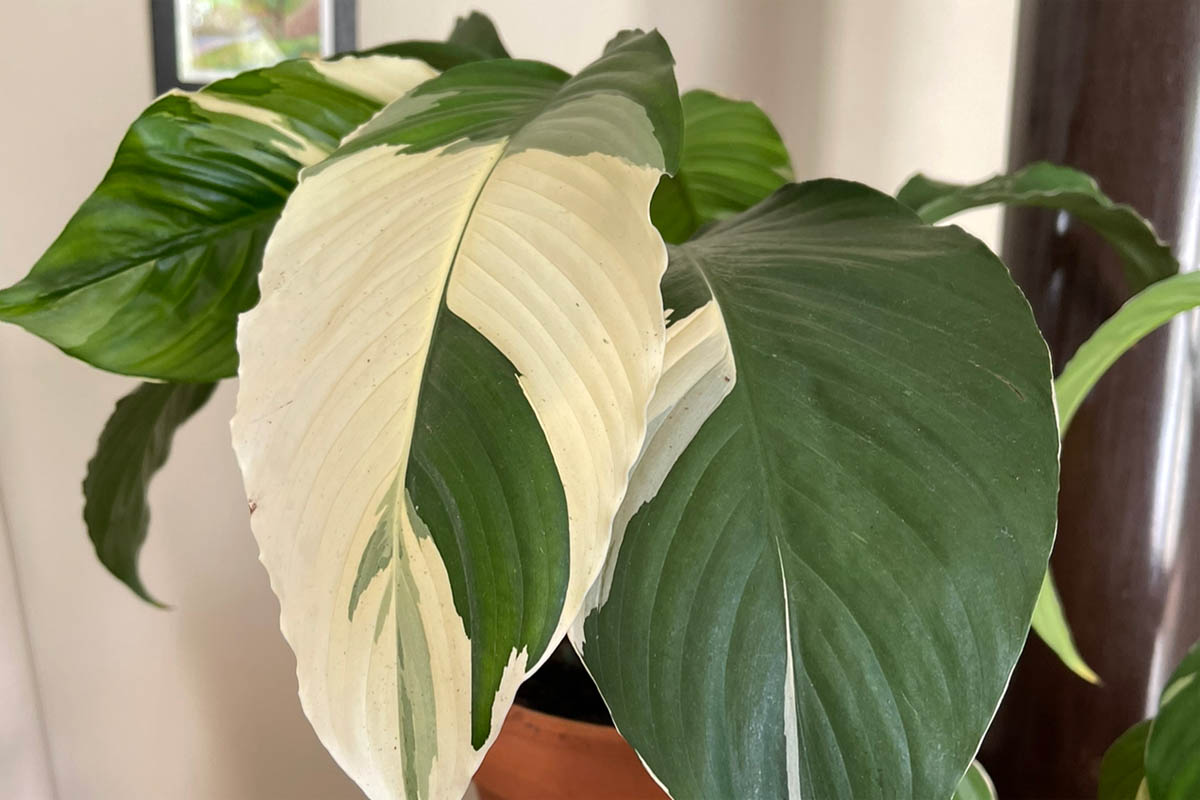
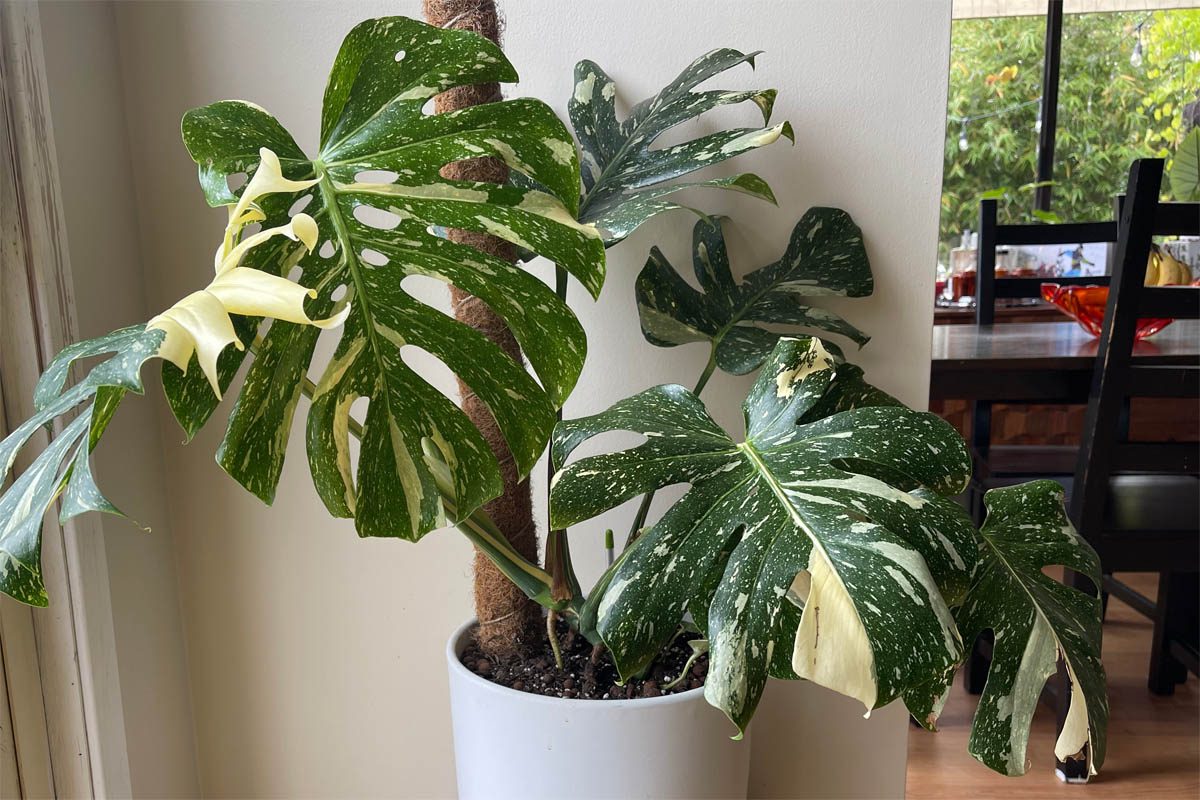
Also known as ‘leaf burn‘, leaf scorch occurs when a plant is exposed to too much sunlight or heat which burns the leaves. Plants at greatest risk include seedlings, shade-loving plants and variegated plants. As you can see in the photo above, the white part of the leaves was scorched, but the green edges are fine. This plant has since been moved to an outdoor conservatory with less direct sun, and away from my plant-eating puppy. I have heard people mention the use of silicone for variegated plants, but it’s not something I’ve looked into. Some people swear it protects the white parts (which have little to no chlorophyll) and produces stronger leaves.

Salt accumulation

Salt accumulation can occur due to over-fertilisation, the use of softened water, and evaporation in low-humid environments. Excessive salts cause osmotic stress, nutrient imbalances, and root damage and can make it more difficult for plants to take up water and nutrients. Common symptoms of excessive salts include leaf burn, browning or yellowing.

Wilting or drooping

One of the most common symptoms of an unhappy plant is drooping leaves which surprisingly is a sign of overwatering or underwatering. When a plant is well hydrated, water within the plant cells exerts pressure against the cell walls, which creates ‘turgor pressure,’ which is essential for maintaining the plant’s rigidity. Surprisingly, overwatering and underwatering have the same effect on the plant. When the plant is overwatered, the roots are starved of oxygen due to air pockets being compacted. So while the soil is wet, the roots are unable to transport water throughout the plant. Obviously, in the case of the under-watered plant, there is not enough water in the soil to maintain hydration and turgor.

Heat

Sometimes even hydrated plants will wilt on extremely hot days due to increased transpiration and the temporary inability of the plant’s water uptake system to keep up with water loss. The roots absorb water through the soil which is transported through the xylem to the rest of the plant. During extreme heat, the water uptake is not sufficient to replace the water lost through transpiration. This leads to a decrease in turgor pressure, causing the leaves to wilt.

Leggy growth

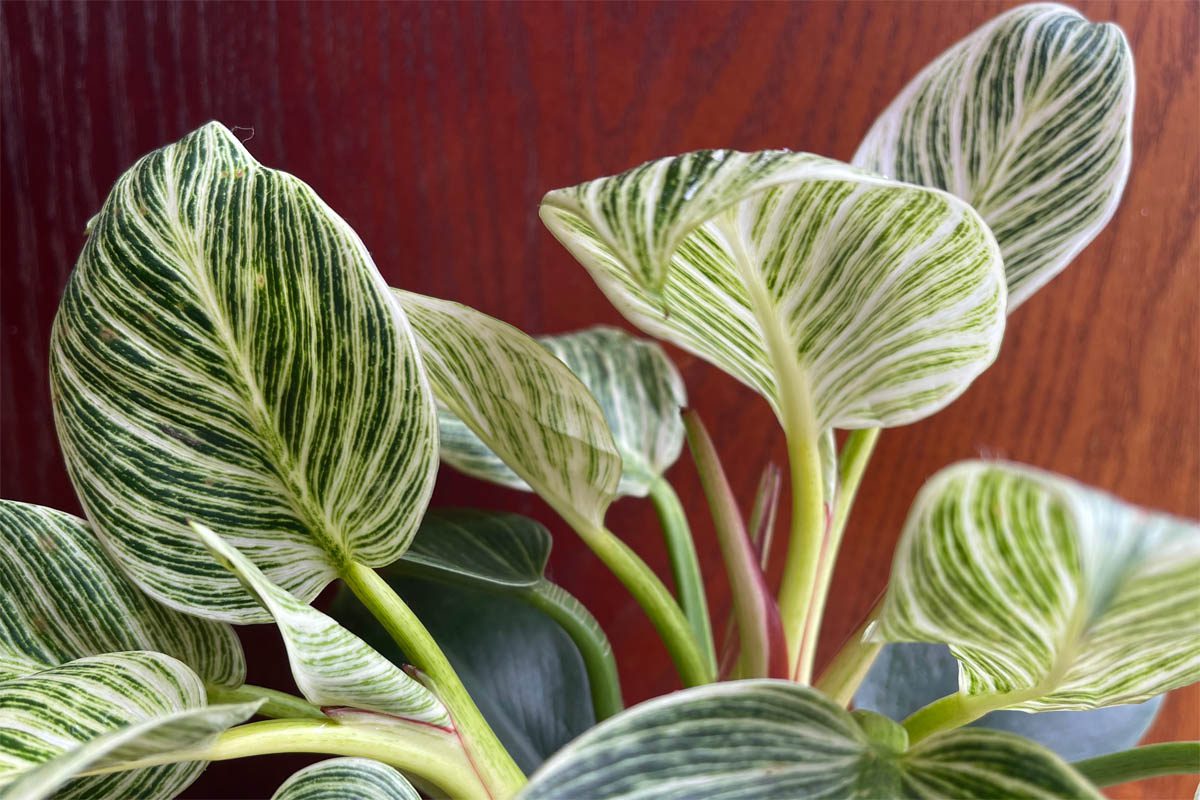
Leggy growth is almost always due to insufficient light. This triggers the elongation of cells at the growth tip to help the plant reach a potential light source. As a result, the plant has uncharacteristically long and thin internodes (the space between nodes) as well as fewer, smaller and cream/yellow leaves that would ordinarily be green.

How to revive your neglected houseplants

How to revive leggy houseplants
Photo by Julia Wilson.

Check for signs of disease or pests

Carefully examine the plant for signs of disease or pests. Look for visible pests and eggs on the plant or soil. Examine leaves for discolouration, spots, wilting, curling, honeydew or webbing. It is important to remember to check the underside of leaves where pests like to hide undetected. Inspect the stems for lesions, oozing or cankers.

If you do notice any signs of pests or disease, take a clear photo and seek advice from your local nursery or garden centre. They will be able to advise you on what product (if any) to use.
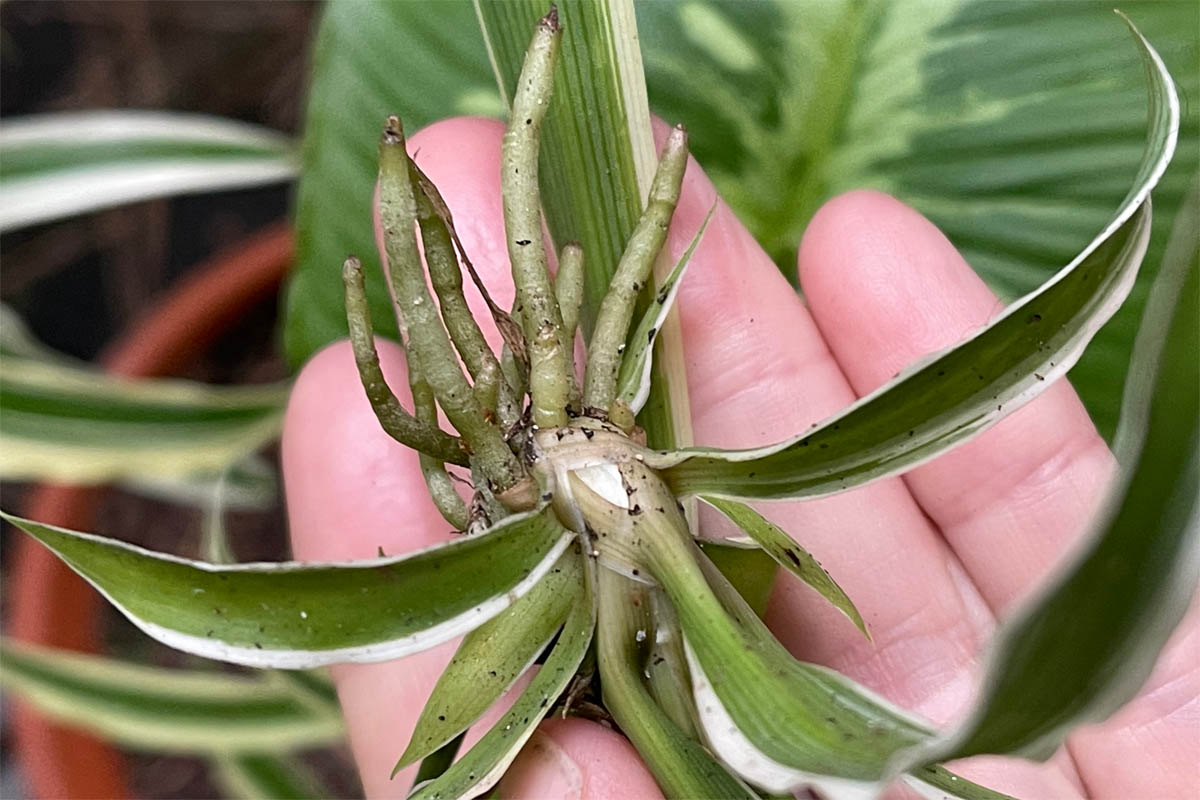
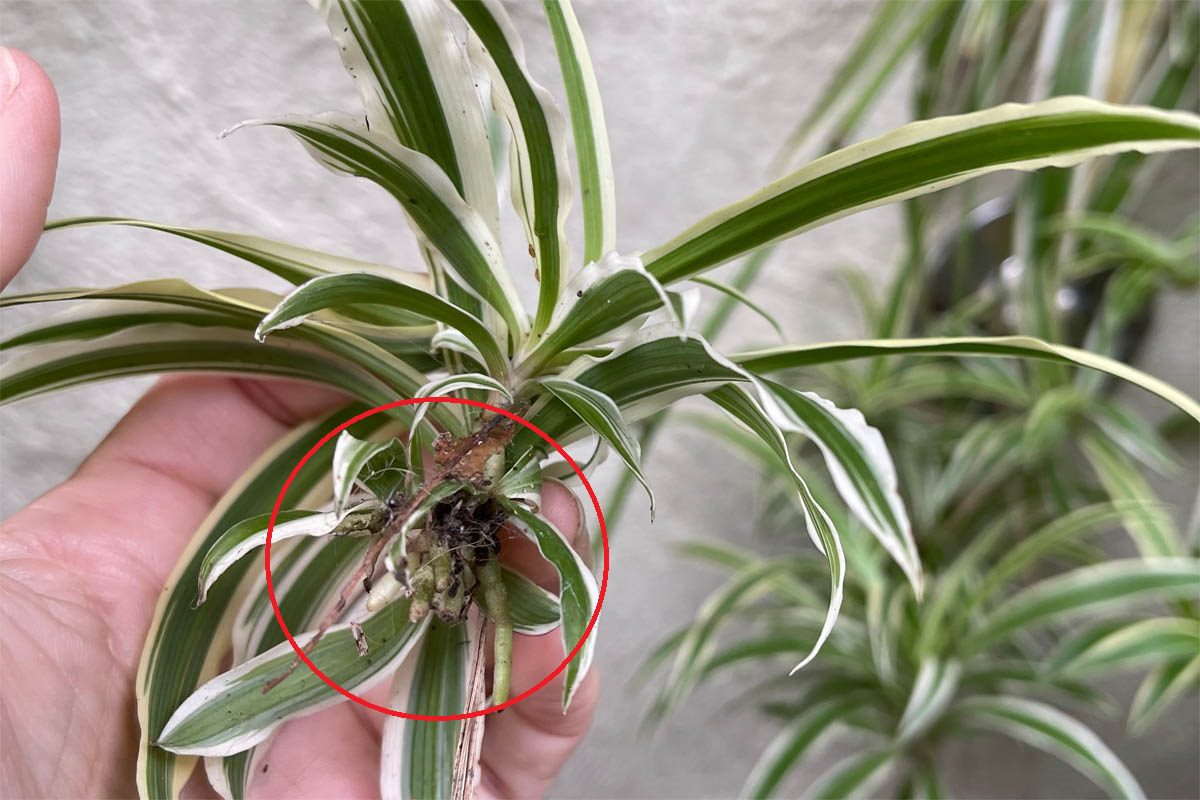
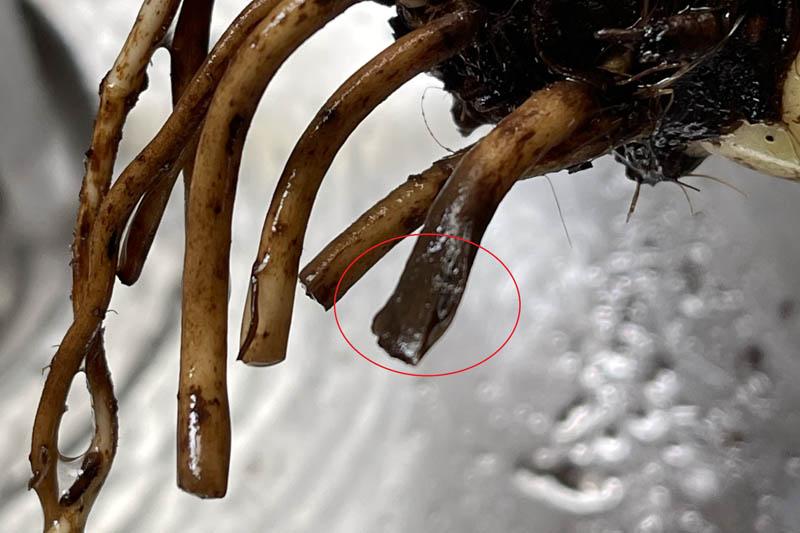
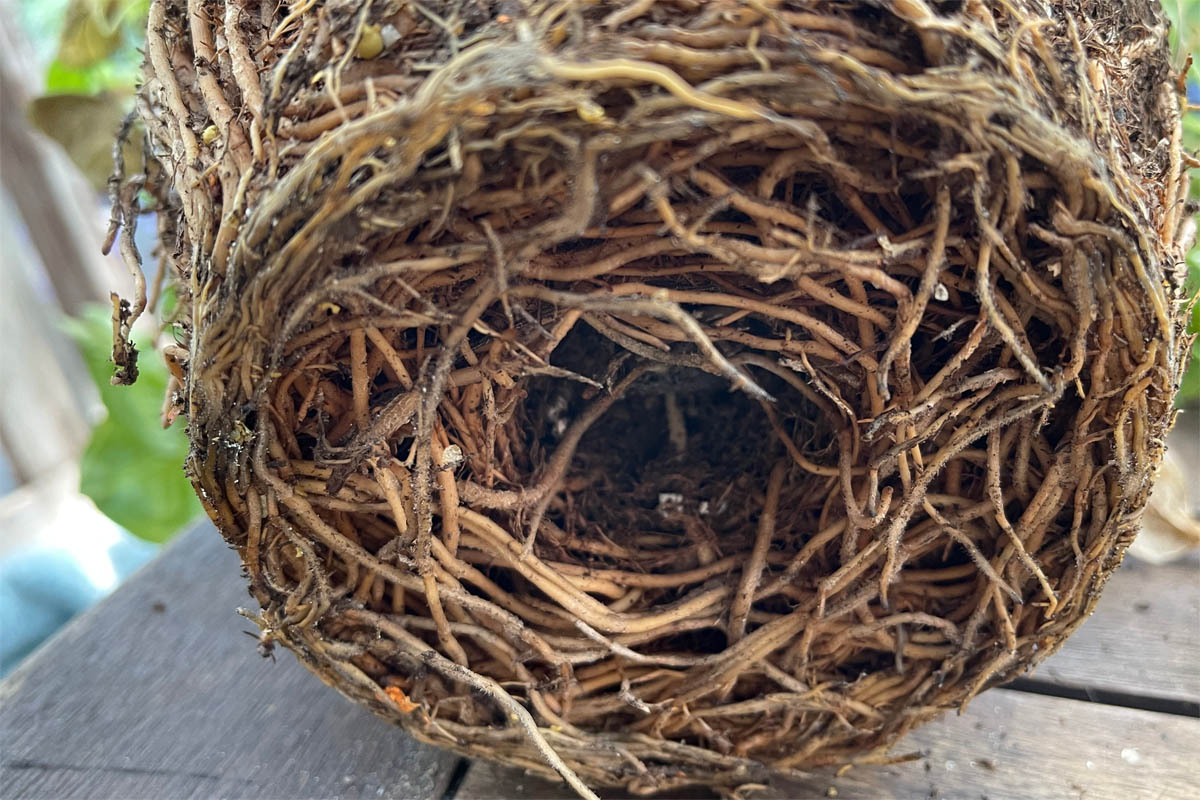
Check for root rot

Remove the plant from the pot and inspect the roots for root rot and parasites. Healthy roots should be creamy-white. Plants with root rot will have brown/black roots, which are soft and break away easily. You may also notice an unpleasant odour.

It can be difficult to save plants with root rot, but in some cases, it can be successful if the plant still has some healthy roots. Rinse the roots with lukewarm water to remove any remaining soil and then use a pair of sterilised scissors to remove all of the diseased roots. Combine a solution of 80% water and 20% hydrogen peroxide, or 10% unscented bleach and 90% lukewarm tap water, and leave the roots and stem to soak for two hours. This should kill off any remaining pathogens on the roots. Hydrogen peroxide is better than bleach, and bleach should only be used in an emergency. Repot the plant in a new pot (or sterilise the old pot), with fresh potting mix.

Root rot
Note the black root which was easily squashed

Trim back leggy stems

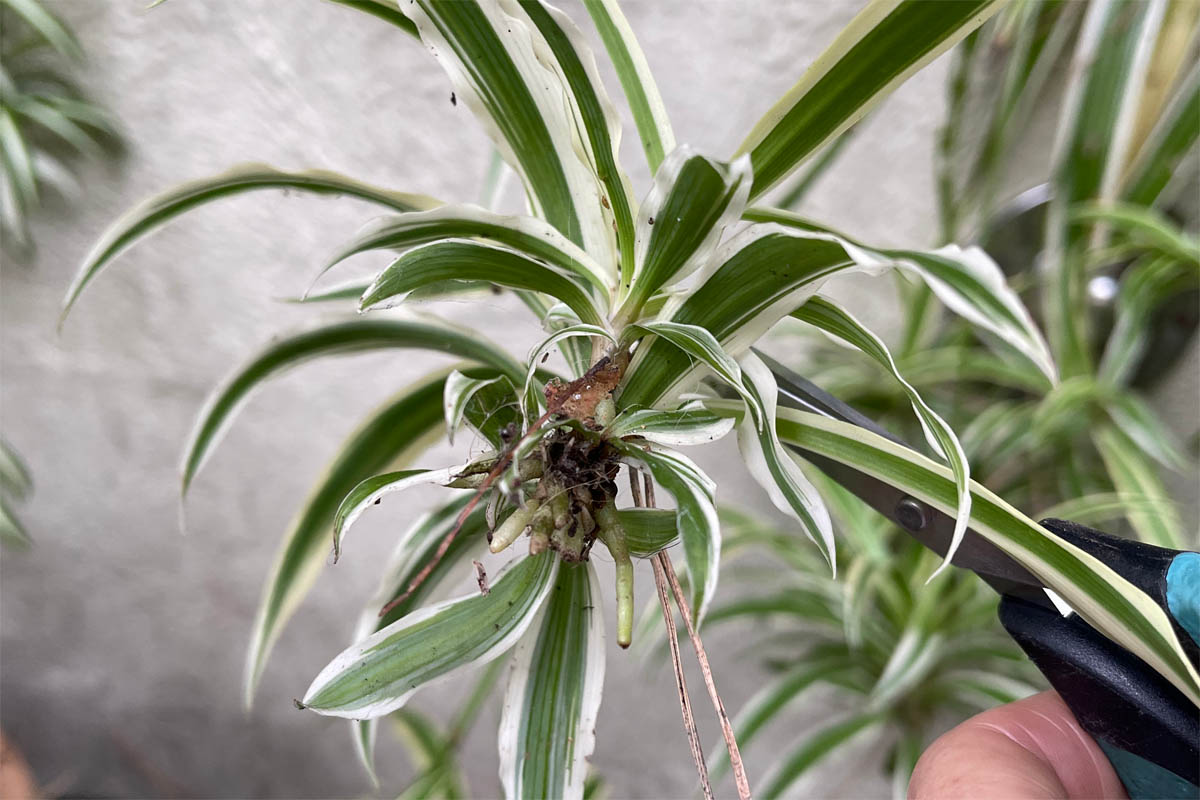
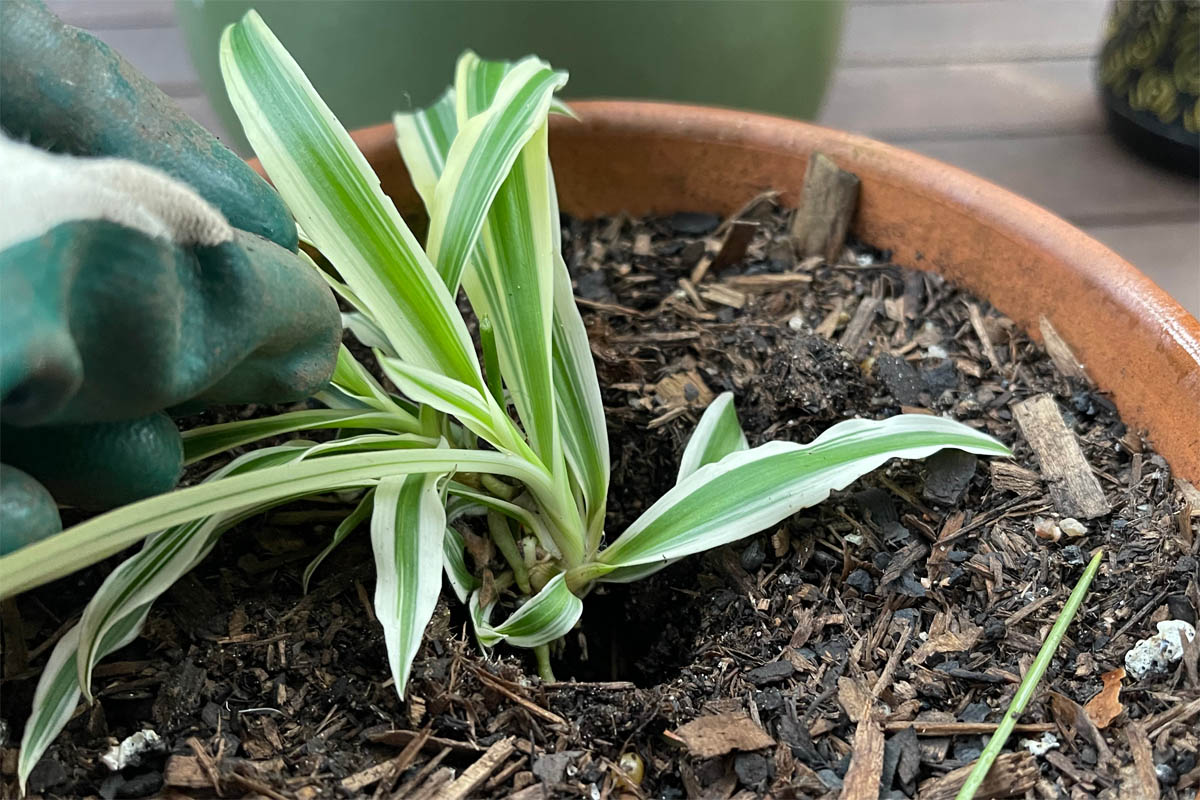
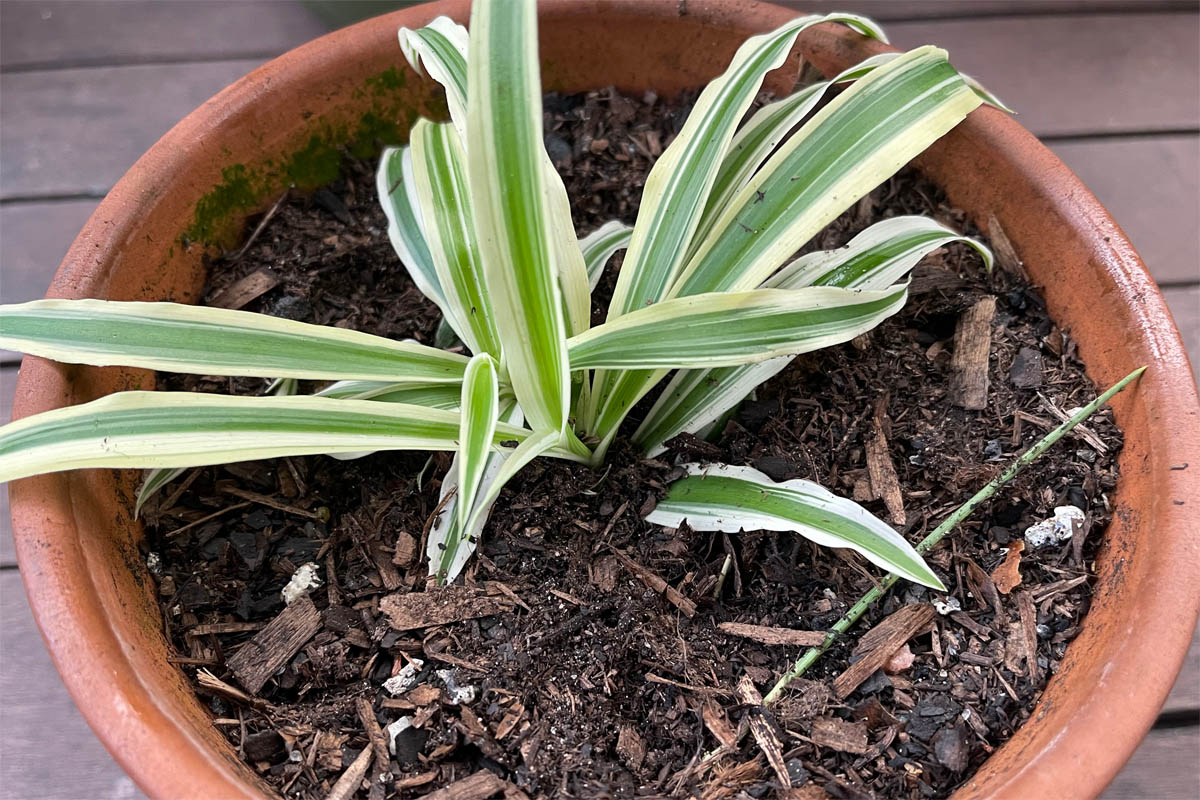
If the plant is a seedling, it may be possible to revive it by moving it to a brighter area. Mature plants that are etiolated will need to be trimmed back, or take cuttings from the parent plant and start again.

Clean the leaves

Dust accumulation on leaves can obstruct sunlight, hindering photosynthesis, and clogging stomata, impeding respiration and transpiration. Regularly cleaning leaves not only improves the plant’s ability to produce energy and exchange gases. Use a soft, damp cloth to clean the leaves. Garden centres and nurseries also sell leaf tonics and leaf-shining products. Don’t do as I did in the 1980s and use petroleum jelly or any other oil-based product to shine the leaves. This will block the stomata which are tiny pores on the surfaces of leaves, that facilitate gas exchange.

Refresh the growing medium

Houseplants should have their potting medium replaced at least every two years.  As plants grow, they absorb nutrients from the potting medium to support their growth and development. Over time, the supply of nutrients in the potting medium becomes depleted. In addition to this, watering also causes nutrients to leach out of the potting medium, particularly if it is well-draining. Excess water washes away soluble nutrients, making them less available for plant uptake.

Always select the appropriate potting medium for your plants. For example, orchids prefer a bark mix, succulents like well-draining soil and most ferns like rich, moisture-retaining soil. Where possible, choose premium mixes over regular, as these contain slow-release fertilisers to keep your plant fed for at least six months.

Check to see if the plant is rootbound

Remove the plant from the pot to check if the plant is rootbound or has root rot. If the plant is potbound, don’t be tempted to jump up several sizes as overpotting can lead to root rot. For small to medium plants, choose a pot that is 2.5 cm wider than the current pot, or 5 – 10 cm for large plants.

Rootbound plant

Water according to the plant’s specific needs

There is no one-size-fits-all when it comes to watering plants. Succulents can go for extended periods without water, while the fern or coleus have higher water needs. I use the Sustee Aquameter to check the moisture content of soil. Knowing the needs of each plant is important too. Some are forgiving and will wilt when they’re thirsty, but quickly recover. I personally find ferns are a bit more fussy, they thrive in my garden, but quickly die inside. Many people have managed to successfully grow ferns as houseplants.

Provide proper lighting

The right light is so important. Cacti and succulents thrive in full sun, while other plants would quickly burn and die. As a rule, there’s three types of indoor positions.

  • Full sun:  An area the plant receives direct sun for at least six hours or more. Cacti and succulents love full sun.
  • Indirect light: Bright, diffused light close to a window but not in direct light. The majority of houseplants fall into this category.
  • Shade: A location where the plant receives minimal direct sunlight and is mostly exposed to low or filtered light. ZZ plant, pothos, ferns and snake plants are all shade-loving.

Remove dead or dying leaves

Remove dead or dying leaves
Photo by Julia Wilson.

Removing dead leaves improves its appearance, enhances air circulation, prevents pest and disease infestation, and makes it easier to monitor the plant’s overall health.

Conclusion

  • Indoor plants take time and work, but with the right care, can add a touch of colour to the home.
  • Only keep the number of plants you can comfortably manage. There’s no point in creating an indoor jungle if you don’t have the time for it.
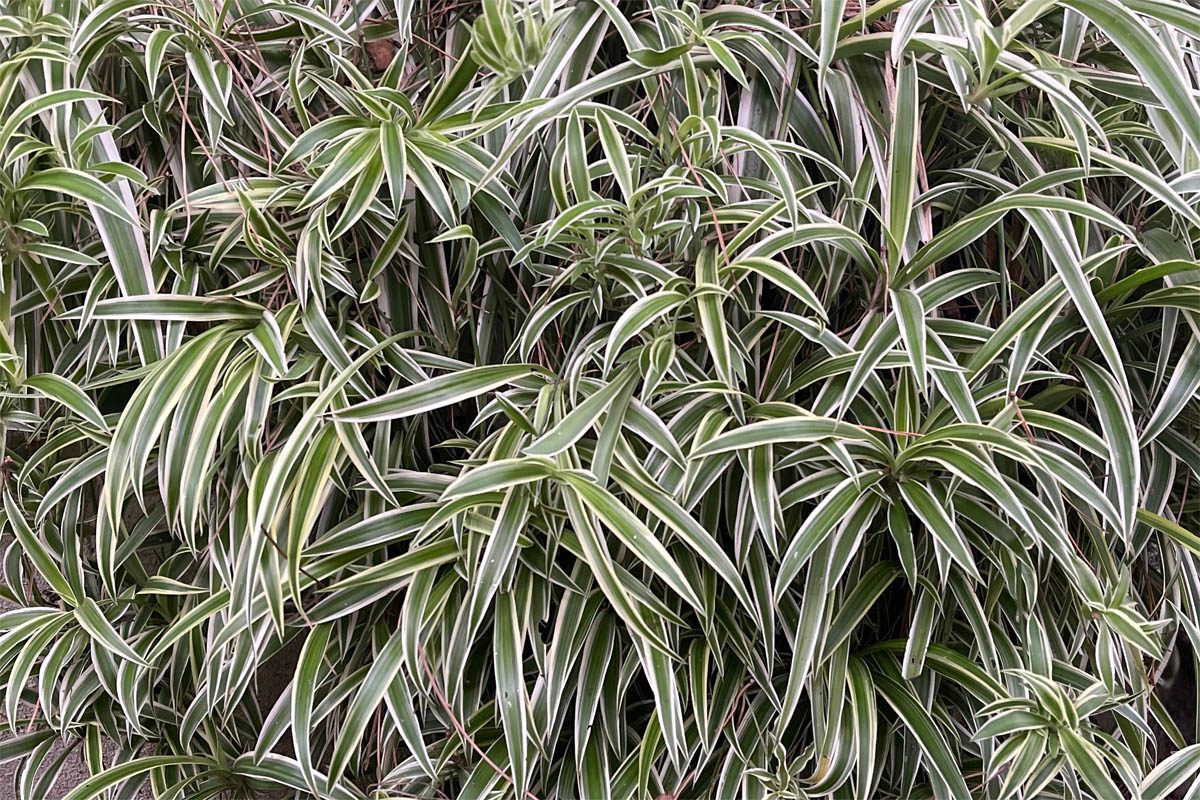
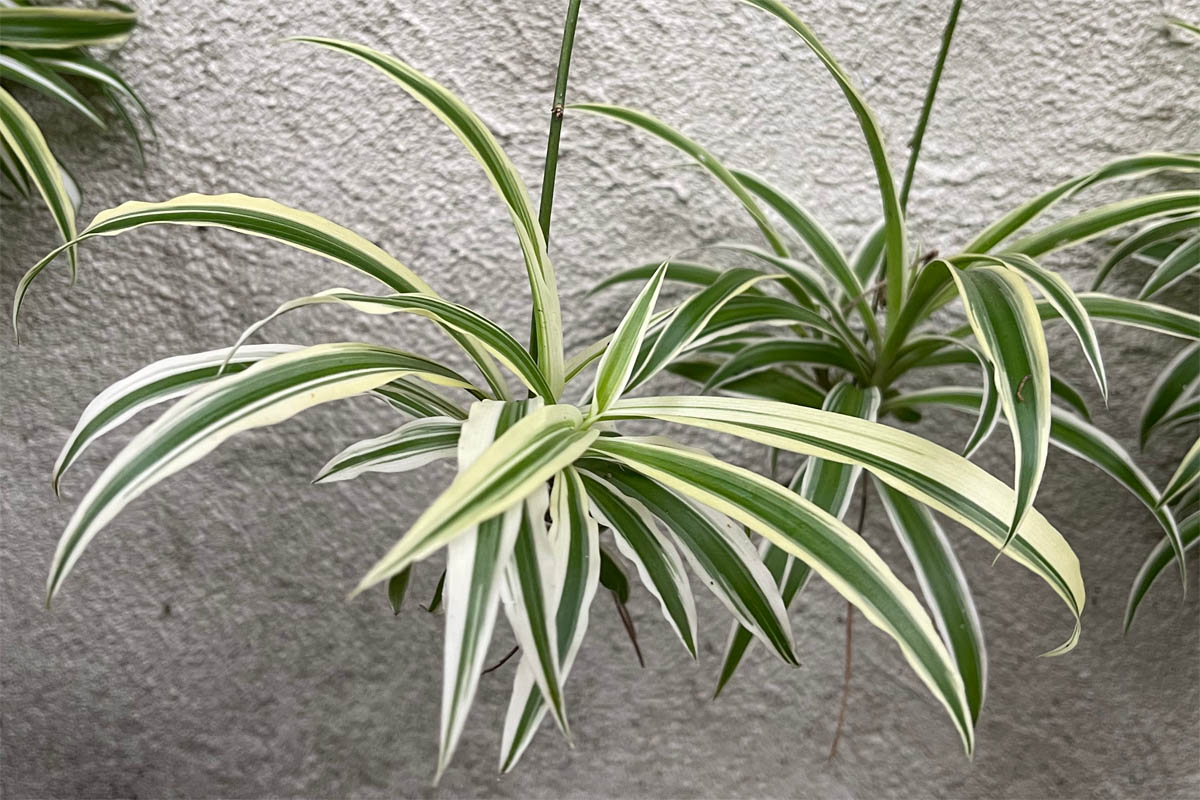
  • Busy people may benefit from growing easy-to-care-for plants such as zz plant, snake plant, spider plant, yucca, orchid, dracaena and rubber tree.
  • Take five to ten minutes, twice a week to check your plants to ensure they are pest free, have enough water, and are not showing signs of disease. I always like to check my plants when I’m having my morning coffee.
  • Fertilise plants during their active growing period of spring and summer.
  • Plants should be repotted at least every two years to replace old potting mix and move to a larger pot if needed.

Print iconPrint-friendly version

Propagating Spider Plants: A Comprehensive Guide

How to propagate spider plant

Types of propagation  Ι   Encouraging a spider plant to grow more spiderettes   Ι  What happens if I leave spiderettes on the plant?  Ι   Common propagation issues   Ι  Conclusion

Propagation is a great way to increase your plant collection for free. Propagation methods can vary depending on the parent plant, which we will outline in this article.

What is spider plant?

What is spider plant?

Spider plant (Chlorophytum comosum) is a clump-forming herbaceous perennial that is native to tropical and subtropical Africa. This hardy plant has attractive green and white striped variegated leaves.

Spider plants are a hugely popular houseplant that looks especially attractive when placed in hanging pots, so the strap-like leaves and spiderettes can cascade down the side of the pot.

In addition to their hardy nature and ease of propagation, spider plants are non-toxic to humans and pets, which makes them a safe option for families.

Spiderette formation
Spiderettes on a stolon
Spiderettes on a stolon. Photo by Julia Wilson.

Mature plants produce spiderettes (also called plantlets or pups), which are baby spider plants. Spiderettes form on long, arching stems called stolons. The stolon grows outwards from the base of the plant, and as it lenghtens, apical buds develop along its length. Apical buds contain meristematic tissue that differentiates into different plant tissues. At the tip of the stolon, the meristematic tissue starts to differentiate into a baby spider plant by forming leaves and adventitious roots (roots that form from non-root tissue). The spiderette can either be left on the plant or removed and discarded or propagated to create more plants.

Formation of a root on a spiderette
Formation of a root on a spiderette. Photo by Julia Wilson.

Types of propagation

Cluster of spiderettes
A large cluster of spiderettes. Photo by Julia Wilson.

The propagating spider plants are division or rooting spiderettes, either by placing the spiderette attached to the stolon directly the into soil, cutting the plantlet off and planting it into a pot with soil or placing it in glass of water, or removing the plant from its pot and dividing it and planting the divisions.

Propagating spiderettes

Spider plant 'plantlet' with established roots.
Spider plant ‘plantlet’ with established roots. Photo by Julia Wilson.

Spiderettes are small offshoots that grow on the spider plant as a part of its natural reproductive process. These offshoots are an essential feature of the spider plant, as they provide an easy method of propagation. Spiderettes emerge from stolons or runners, which are long, thin stems that grow from the parent plant. The spiderette consists of a small rosette of leaves, and as it matures, roots develop. In the wild, as the spiderette grows, gravity pulls it to the ground, where it will take root.

Spider plant plantlets
Spider plant plantlets. Photo by Julia Wilson.

Spiderettes can be placed in water or soil, the method for both is almost the same. I prefer to plant directly into soil as the roots should already be established and therefore water rooting isn’t necessary. However, water propagation can be beneficial if you have a plantlet without an established root system. If the parent plant is yours, you can wait for roots to develop, if you’ve been given a plantlet without roots, water propagation is the way to go.

Method:

Select healthy spiderettes, with a visible root system.

Spider plant roots
Photo by Julia Wilson

Snip the plantlet from the runner, where you snip is unimportant, I’d snip it as close to the plantlet as possible.

Cutting a spider plant pup from the stolon
Photo by Julia Wilson

Prepare a pot with premium potting mix and use your finger to make a hole wide enough to fit the plantlet.

Placing a spider plant plantlet into a pot.
Photo by Julia Wilson

Backfill to ensure the plantlet roots are covered and press down to remove any air pockets.

Freshly potted spider plantlett
Photo by Julia Wilson

Ensure the soil remains moist but not saturated.

Notes:

Root systems:Spiderettes that do not have an established root system typically require 2 to 3 weeks to develop roots. During this period, it is essential to provide proper care, including adequate moisture, light, and warmth, to promote healthy root growth and ensure successful establishment.

Water propagation: If propagating in water, place the plantlet into a glass of water on a windowsill. It should receive bright but indirect light. Roots should develop within 2 to 3 weeks, it may take longer during winter. Once a healthy root system has developed, transfer the plant to a prepared pot with soil. Spider plants grow better in soil than water as soil contains more nutrients.

What size should the plantlet be before you cut it off?Spiderettes should be around 10 cm (4 inches) before cutting, this will ensure the plantlet has developed roots, which will speed up the propagation process.

Division

If there are no spiderettes on your mature spider plant, you will have to divide it instead. This method requires a little more work than the plantlet method. Always wear gardening gloves when handling soil or potting mix.

Method

  • Water the spider plant thoroughly a few hours before dividing it to ensure the roots are well-hydrated.
  • Carefully remove the plant from the pot, take care to not damage the delicate roots.
  • Examine the root ball for natural divisions or clusters of leaves with their own root system.
  • Use your hands to gently separate the rootball into natural divisions.
  • Place the individual divisions into a freshly prepared pot with a premium potting mix. The roots should be completely below the soil.
  • Water in well.
  • Place the plants in bright but indirect light.

The divided sections should establish themselves in a few weeks as healthy, independent plants. Monitor their growth and adjust watering and care as needed to ensure optimal development.

Encouraging a spider plant to grow more spiderettes

A happy and healthy spider plant will naturally produce platelets when it is large enough.

  • Always select a premium potting mix. Premium potting mixes are made from quality ingredients and contain a slow-release fertiliser that will feed the plant.
  • Plant in a pot that is 2.5 cm (1 inch) wider than the root ball. A hanging planter is recommended, to allow the arching leaves, stolons and spiderettes to naturally cascade down.
  • Spider plants prefer bright but avoid direct light which will scorch the leaves. Having said that, the spider plants featured in this article are located in an east-facing position (which receives a small amount of morning light), in front of large bamboo plants, so they don’t receive optimal light.
  • Spider plants have moderate light requirements, it is better to under water than over water which could lead to root rot. I have found spider plants to be quite forgiving. They will wilt when the soil is too dry, but quickly recover once they have received a drink.
  • Water your spider plant when the top 2.5 cm (1 inch) is dry. The frequency of watering will vary depending on the heat and the season. Water more often during hot weather and less often during cool weather. As a guide, I water my potted spider plant twice a week in the summer and once a week during the cooler months.
  • Fertilise your spider plant with a liquid or slow-release fertiliser. Always follow the instructions on the pack. Spider plants do best with a balanced fertiliser of 20-20-20. That is equal parts of nitrogen, phosphorous and potassium).

What happens if I leave spiderettes on the plant?

Should you cut the spiderettes off the parent plant?  Spiderettes left on the parent plant will continue to grow and develop their own root system. They are able to draw nutrients and water from the parent plant via the stolon to which they are connected. Leaving spiderettes on a spider plant is not harmful to the parent plant.

To remove the spiderettes, simply snip the stolon with the plantlet attached as close to the parent plant as possible. You can either discard them or propagate them to increase your plant collection.

If the plantlet roots come into contact with soil, they will establish themselves as an independent plant in the ground. Under the right conditions, plants can continue to grow and form a large mass of spider plants and spiderettes. The image below of my spider plants shows just how much they can spread. This collection came from two purchased spider plants I had to move outside because the cats kept chewing and damaging them (they’re non-toxic).

Large collection of spider plants
Photo by Julia Wilson.

In some cases, if the roots of a spiderette come into contact with the soil, they will establish themselves in the ground, forming a new, independent plant. This can lead to a tangled, dense growth of spider plants, as multiple plants share the same space and resources.

Common propagation issues

Spider plants are one of the easiest plants to propagate and care for. However, sometimes problems develop with newly propagated plants.

Root rot:

Root rot can develop if the plant is overwatered. When soil becomes waterlogged, the excess water fills the spaces between soil particles that would otherwise contain air. These air pockets are essential for plant roots, as they provide the oxygen necessary for root respiration and nutrient uptake. As the roots are unable to obtain enough oxygen, they slowly suffocate.

Slow or stunted growth:

Growth problems can develop for several reasons. Inadequate light, insufficient nutrients or unsuitable temperature levels. Plant in bright but indirect light, such as a short distance from a window. Use a balanced fertiliser during the active growing season (spring and summer), and maintain temperatures between 18°C to 24°C (18°C to 24°C).

Yellowing or browning leaves:

Yellowing or brown leaves can occur due to under-watering or too much sunlight which will scorch the leaves. Fertilise with a balanced fertiliser and repot once every one or two years in a fresh potting mix.

Conclusion

  • Spider plant propagation is easy via division or cutting spiderettes from the parent plant and placing them in soil or water.
  • It can take 6 – 12 months for the plant to reach a good size after propagation and up to two years before it is large enough to produce spiderettes.
  • Propagating plants is a great way to increase your plant population and provides free plants to keep or share with friends and family. Other easy-to-propagate plants include Boston Fern, String of Pearls, Snake plant, ZZ plant, Pothos, Dieffenbachia, Mini Monstera, Syngonium and Peace Lily.
  • I recommend always keeping a few plastic pots from purchased plants as well as a collection of terracotta pots and potting mix so that you are always ready to propagate.

Print icon Printer Friendly Version

Peace Lily Care: Tips For a Healthy Plant

How to care for peace lily

At a glance

Family Araceae
Botanical name Spathiphyllum spp.
Common names Peace lily, White flag, Cupido peace lily, White peace lily, Espatifilo, Mauna Loa, Snowflower
Lifespan Perennial
Habitat Tropical rainforests
Growth habit Clumping
Mature height 30 – 120 cm
Flower colour
White, green
Leaf colour
Green, variegated
Native to Americas and Southeast Asia
Toxicity Toxic to cats and dogs
Soil Moisture-retaining
Humidity High
Propagation Division
Care level Easy

Read more

Boston Fern Care: Tips for a Lush and Healthy Plant

Boston fern care

At a glance   Ι  What is Boston fern?  Ι   How to care for Boston fern  Ι   Propagation  Ι   Repotting

At a glance

Family Lomariopsidaceae
Botanical name Nephrolepis exaltata ‘Bostoniensis
Common names Boston fern, Fishbone fern, Tuber ladder fern
Lifespan Perennial
Habitat Coniferous forests
Mature height 50 – 150 cm
Flower colour
Leaf colour
Green
Native to Americas
Toxicity Pet friendly
Soil Moisture-retaining
Humidity High
Propagation Division
Care level Easy

Read more

Is Christmas Cactus Toxic to Dogs?

Is Christmas cactus toxic to dogs?

Christmas cactus (Schlumbergera bridgesii) is non-toxic to dogs and can be safely grown in homes with pets, with care.

Read more

Is Mistletoe Toxic to Dogs?

Is mistletoe toxic to dogs?

Mistletoe (American and European) is toxic to dogs. The toxic properties are viscumin and lectins – (V. album), and toxalbumin, pharatoxin, viscumin – (P. serotinum), which can cause gastrointestinal upset, low blood pressure and low heart rate.

What is mistletoe?

Botanical name Phoradendron serotinum (North American) and Viscum album (European)
Common names Mistletoe, English mistletoe, American mistletoe, Common mistletoe, Oak mistletoe
Mature height 150 cm
Flower colour
Yellow, green
Leaf colour
Green
Native to Europe, North Africa and western Asia
Toxicity Toxic to dogs
Toxic compounds Viscumin and lectins – (V. album)

Toxalbumin, pharatoxin, viscumin – (P. serotinum)

Toxic parts All parts of P. serotinum are toxic, all parts of V. album apart from the berries
Severity Mild to moderate

Mistletoe is a semi-parasitic flowering plant, made up of a thousand species that lives on the crowns of trees where it takes water and nutrients from its host plant. Birds feed on the white berries in winter, which contain a sticky substance called viscin. Seeds contained within the berries stick to the bird’s beak, which the bird wipes off on tree branches or passes out of the body via the feces.

The two most common species of mistletoe are American (Phoradendron serotinum) and European (Viscum album). European mistletoe is more toxic than American and is not native to or sold in the United States of America. European mistletoe has long, oval leaves with clusters of two to six berries. American mistletoe has short, oval leaves with clusters of ten or more berries. American mistletoe is the most common species of mistletoe used to decorate homes at Christmas.

The tradition of kissing under the mistletoe originated in ancient Greece where mistletoe was associated with fertility. Later, in Victorian England, it was said if a girl refused a kiss under the mistletoe, she would not receive any marriage proposals.

Related: Caring for a Christmas tree

Toxicity

While mistletoe berries may be a source of food to birds, it contains a number of properties that are toxic to dogs including proteins (alkaloids), viscumin and lectin proteins  – (V. album), and oxalbumin, pharatoxin viscumin (Lectins, Phoratoxins) – (P. serotinum).

Small ingestions can cause gastrointestinal signs which include diarrhea, drooling, loss of appetite and vomiting. Large ingestions can lead to bradycardia (slow heart rate) and hypotension (low blood pressure).

Clinical signs

  • Hypersalivation
  • Vomiting
  • Diarrhea
  • Difficulty breathing
  • Hypotension (low blood pressure)
  • Bradycardia (slow heart rate)

First aid

If it is safe to do so, remove any remaining plant matter from the dog’s mouth and offer a drink of something tasty such as milk. Do not induce vomiting unless you have been instructed to do so.

Contact your veterinarian or pet poison helpline for further advice. They may recommend a wait-and-see approach if the dog only consumed a small amount and appears otherwise well. If the dog ingested a large amount of mistletoe or has clinical signs, you will be instructed to bring the dog in for treatment.

Treatment

Unfortunately, there is no antidote for mistletoe toxicity, the goal of treatment is to prevent further absorption and manage clinical signs.

If ingestion was recent, the veterinarian will administer medication to induce vomiting followed by activated charcoal to bind to any remaining plant matter in the GI tract. Antiemetics and gastric protectants can be administered to cats who are vomiting, as well as intravenous fluids to prevent or treat dehydration and electrolyte derangements.

Toxicity of common Christmas plants

Christmas Plants and Their Toxicity to Dogs

Christmas plants toxic and non-toxic to dogs

Christmas plants and pets

During the Christmas period, many homes are decorated with plants. Knowing which ones are safe and which ones are potentially dangerous can save pet owners an emergency trip to the veterinarian. This list includes some of the most common Christmas plants and includes the toxic properties.

Although many of the plants are labelled non-toxic, ingestion of large amounts of any plant matter can cause gastrointestinal upset.

Related: Caring for a Christmas tree

Read more

Is Gold Dust Dracaena Toxic to Dogs?

Is gold dust dracaena toxic to dogs?

Gold dust dracaena (Dracaena surculosa) is toxic to dogs. The toxic principle is steroidal saponins which cause vomiting, loss of appetite, depression, hypersalivation and incoordination.

Read more

Is Philodendron Birkin Toxic to Dogs?

Is Philodendron birkin toxic to dogs?

Philodendron birkin is toxic to dogs. The toxic principle is insoluble calcium oxalate crystals that penetrate the delicate tissues of the mouth and throat causing intense pain and burning.

Read more

Is Seasol Toxic to Animals?

Is Seasol toxic to animals?

Seasol is not toxic to animals and is safe to use on plants in homes with pets as long as care is taken.

Read more